Corset 1, per Alter Years – Easy Tabbed Renaissance Corset Kit
Simple post traumatic synopsis: It’s done; it works. Depending on how this one wears under my future costume projects, the next one will undoubtedly be an experiment with different materials and techniques. My first, basic chemise (Simplicity 4488) is underneath of the corset.
Corset 2, per Margo Anderson
With some experience on how corsets should look, feel, and hold up over the course of a faire day under my belt, I knew which direction I needed to go with Corset 2.
This is an untabbed corset made of bright green duck layers, extra large cable ties, and dark green cotton for bias tape. I will skip the gory details, since I followed the pattern to the letter until the final fitting. At that time, I had to shorten the top front, which meant cutting the cable ties a few more times. I also had a heck of a time getting the shoulder straps correct. In the end, I attached them to the front at an angle and shortened them by maybe three inches. I also finished the side seams differently than the pattern called for, due to puckering at the back under arm that I could not smooth out. I basically darted that area and sewed the seams down to one side rather than making the flat fell seams. I went with hand sewn eyelets, since I am not a fan of grommets. I am terrible at applying them, and my first corset already shows some signs of wear…probably due to the stress it went through getting tightened.
I like this one–it is comfy and did well in the one hour movement test. The problem with my first corset was that it had to be fastened too tight to feel safe and still traveled south in my lower class bodice and north in my upper class gown. I did not enjoy the stabbing of the hips in Corset 1, which was my reason for going untabbed this time around.
In addition, this pattern resulted in a pair of fitting strips, which will certainly come in handy down the road.
Corset 2 is shown with the far-less-than-perfect low-necked smock, which will be replaced as soon as I have time. I will have to employ two string lacing for this, as you can see from the back view.
Corset 3, per Simplicity 2621
I had a baby, and my old garb doesn’t currently fit. Thus, Corset 3 was conceived. The theme of 1Q2011 is “Use what you have”, so this corset was also a remnant piece. This is a busked corset with unboned waist tabs; the thin straps tie in the front. For some reason, I thought the Simplicity pattern would be less work than a Margo, but thanks to Margo, I’m nitpicky about the fit of my garb, so it took just as long.
I don’t normally, but I did a mock-up for this Big 3 pattern–only because I shortened the pattern by an inch (and citing my maroon and gold gown as a size reference–it would have been too long). The mock-up was done in foiled linen (the same as my maternity under-kirtle) and only took about an hour to fit. Once fitted, I ran to my stash for the largest pieces. I used red and black twill for the outer fabric and red and unbleached canvas for the inner fabric. The bones are heavy duty cable ties, and the busk is basswood. The binding is gray cotton. The busk ribbon is satin, while the back lacing and strap lacing are black macrame cording. Once I applied the binding, I realized that the color scheme is totally Picard.
Construction was straightforward, and being familiar with how a corset should go together, it was very easy. I fudged the seam allowances in some places where it wasn’t clearly marked in the instructions or on the pattern. The directions bind the inside seams, stitching them to the lining, but I decided to serge instead. [I think it’s unnecessary torture to sew down binding if you don’t have to.] My boning channels varied from the directions, since the cable ties are wider than regular plastic boning. That affected the number of channels that I was able to squeeze in, but it did not affect the strength of the corset, obviously.
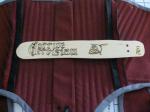
The busk was new for me, and I would certainly make another one if it comes up. Basswood was the closest option to “strong with a bit of give” wood that I could find at Joann’s. Since the piece was so thin, and I didn’t have a circular saw on hand, I cut it with my rotary cutter (which may never speak to me again), sanded it with a medium grain sheet of sand paper, and drilled the holes in the course of an hour. Cutting was frustrating because of the grain of the wood, which doesn’t take turns well, but I got through it. The most fun came with some customization. I used my soldering iron to burn in “Corripe Cervisiam” (“seize the beer”, says the internet), a picture of a lone hop (sing.?), and the year. It was the first time I got to use my Ultimate Crafting Tool, and I did enjoy burning something.
Since I have my handy-dandy Simflex gauge, I didn’t even cutout the eyelet guide that came with the pattern. I stitched the back and strap lacing holes with craft thread (cheap embroidery floss). I do love the thin straps on this corset because my green corset’s straps show in the front corners and arm holes of every bodice I wear. I am also quite a fan of the unboned waist tabs because they cover my sub-waist fluff without painfully poking at it.


